Spring AOP의 프록시 생성 방식
2024년 11월 25일 작성
AOP
-
aop는 모듈로 나눠진 비즈니스 로직들이 공유하는 기능을 말한다. 이미 기능적으로 나눠져있는 모듈이지만 횡단하는 공통 로직이 있기 마련이다. 그 예시로, 트랜잭션 처리 또는 쿼리 갯수 카운팅 등이 있을 수 있다. 이런 로직은 보통 비즈니스 로직을 감싸고, 그 전 후로 필요한 동작을 하는 형태로 구현된다.
-
이런 횡단적 관점으로 공통된 로직을 모듈화하기 위해, 스프링에서도 AOP 기능을 제공한다.
Spring AOP
-
Spring의 AOP의 대표적인 예시는 @Transactional 이 있다.
-
Spring의 AOP는 프록시 객체를 활용해 AOP를 구현하고 있다.
-
Spring AOP는 jdk dynamic Proxy 또는 cglib 으로 프록시를 생성한다.
- 조건들을 분기처리해서 타겟 클래스에 적절한 방식으로 프록시를 만든다.
-
특히 Spring Boot 를 사용할 때는 cglib를 활용하는 방식이 default 로 동작한다.
- Spring boot의 auto configuration은 기본적으로 Spring의
proxyTargetClass프로퍼티를 true 로 설정한다.// spring-configuration-metadata.json { "name": "spring.aop.proxy-target-class", "type": "java.lang.Boolean", "description": "Whether subclass-based (CGLIB) proxies are to be created (true), as opposed to standard Java interface-based proxies (false).", "defaultValue": true } - Spring boot가 CGLIB 를 기본으로 채택한 이유는, 바이트코드를 수정하는 방식인 cglib 을 사용하는 것이 성능상 이점이 있기 때문이다.
- Spring boot의 auto configuration은 기본적으로 Spring의
spring.aop.framework.DefaultAopProxyFactory (Spring) 를 확인해보면 다음과같이 분기처리가 돼있다.
public class DefaultAopProxyFactory implements AopProxyFactory, Serializable {
    @Override
    public AopProxy createAopProxy(AdvisedSupport config) throws AopConfigException {
        if (config.isOptimize() || config.isProxyTargetClass() || hasNoUserSuppliedProxyInterfaces(config)) {
            Class<?> targetClass = config.getTargetClass();
            if (targetClass == null) {
                throw new AopConfigException("TargetSource cannot determine target class: " +
                        "Either an interface or a target is required for proxy creation.");
            }
            if (targetClass.isInterface() || Proxy.isProxyClass(targetClass) || ClassUtils.isLambdaClass(targetClass)) {
                return new JdkDynamicAopProxy(config);
            }
            return new ObjenesisCglibAopProxy(config); // cglib proxy 생성
        }
        else {
            return new JdkDynamicAopProxy(config);
        }
    }

    //...
}
만약 프록시 기본 생성 전략이 CGLIB 이라 하더라도 (proxyTargetClass 가 true)
타겟이 클래스가 아닌 인터페이스이거나, 이미 프록시인 경우 또는 람다 실행을 위해 jvm 이 생성한 클래스이면 JdkDynamicAopProxy 를 사용한다.
이 외에는 Spring boot 사용시 일반적인 프록시 객체 생성에는 cglib proxy 가 생성되는 것을 확인해볼 수 있었다.
Jdk Dynamic Proxy 만들기
Jdk Dynamic Proxy 방식으로는 어떻게 프록시를 만드는지 학습해보자.
-
jdk dynamic proxy 는 인터페이스를 구현하는 방식으로 프록시를 만든다.
-
인터페이스만 명시해서 구현하는 방식이기 때문에 클래스타입으로 캐스팅할 수 없다는 단점이 있다.
예제
간단한 예제: TargetInterface 를 구현하는 클래스 TargetClass 의 프록시 객체를 jdk dynamic proxy 방식으로 만들어봤다.
package springproxy.jdkdynamic;

public interface TargetInterface {

    void print();

}
package springproxy.jdkdynamic;
public class TargetClass implements TargetInterface {
public void print() {
System.out.println("The original print() logic.");
};
}
package springproxy.jdkdynamic;

import java.lang.reflect.InvocationHandler;
import java.lang.reflect.Proxy;

public class JdkDynamicProxy {

    public static void main(String[] args) {
        TargetClass target = new TargetClass();

        InvocationHandler invocationHandler = (proxy, method, args1) -> {
            System.out.println("This is a logic before the method is called.");

            if (method.getName().equals("print")) {
                method.invoke(target);
            }

            System.out.println("This is a logic after the method is called.");
            return null;
        };

        Object proxyObjext = Proxy.newProxyInstance(TargetClass.class.getClassLoader(), new Class[]{TargetInterface.class},
                invocationHandler);

        try {
            TargetInterface proxy = (TargetInterface) proxyObjext;
            proxy.print();
            /**
             * 결과:
             * This is a logic before the method is called.
             * The original print() logic.
             * This is a logic after the method is called.
             */
        } catch (Exception e) {
            e.printStackTrace();
        }
    }

}
Proxy.newProxyInstance로 프록시 객체를 만들었다. 프록시 객체는 우리가 호출을 원하는 메서드마다 로직을 구현하는 것이 아니라, 하나의 invocationHandler 내에서 원하는 메서드를 찾는 분기처리를 해줘야한다.
여기서 Proxy.newProxyInstance 를 사용할 때, 인자로 인터페이스 클래스를 지정해주는 것을 확인할 수 있다.
그리고 메서드를 호출할 때 클래스 가 아닌 인터페이스로 해준 것 또한 확인할 수 있다.
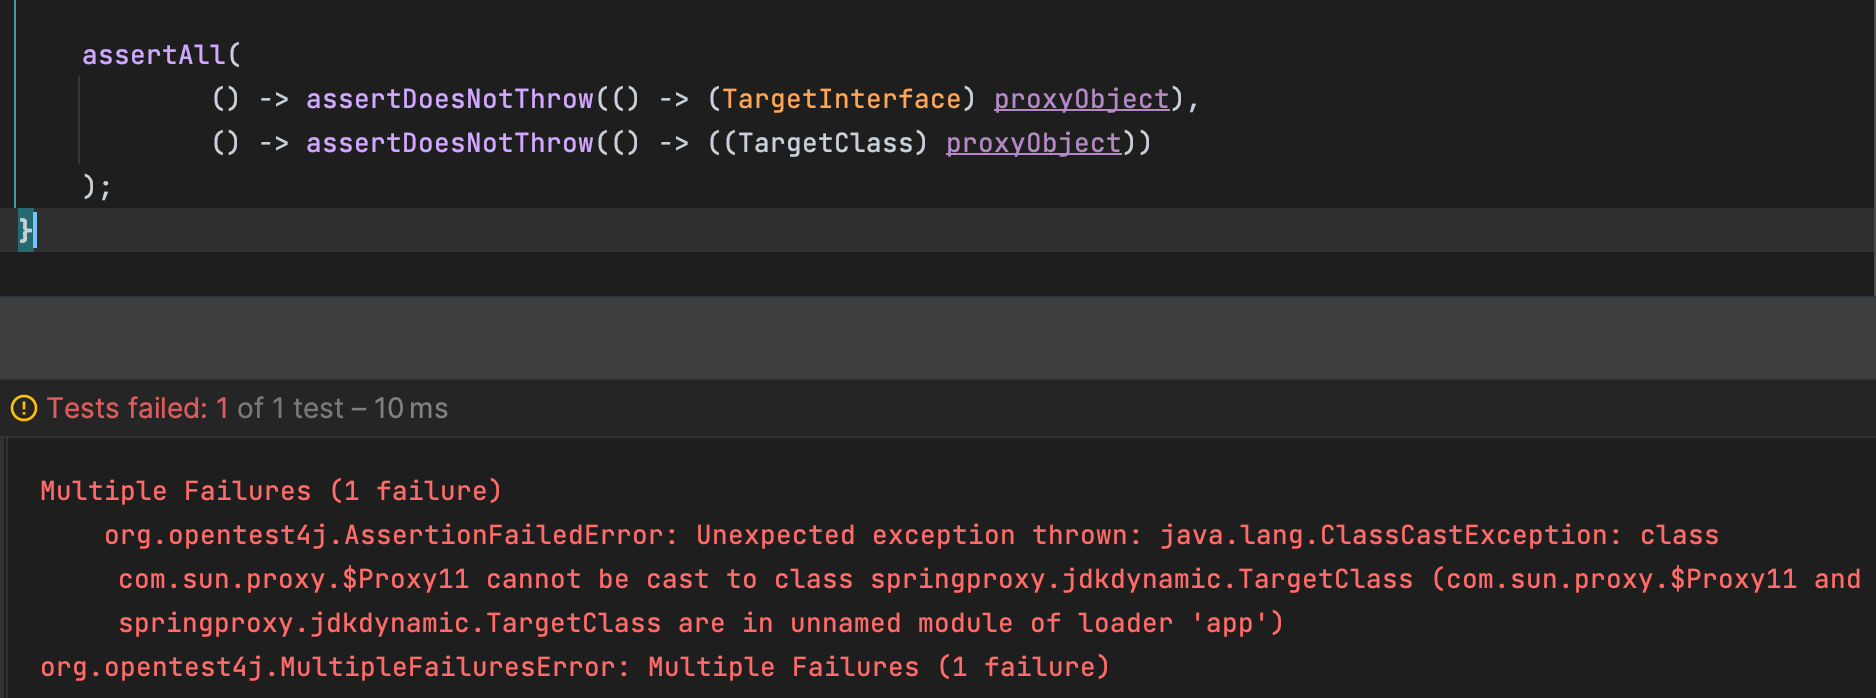
이미 클래스 타입으로 캐스팅할 수 없는 것을 알고 있지만, 한번 확인해보자. 만약 여기서 class 타입 캐스팅을 하면 어떤 일이 일어날까?
@Test
void checkInstanceOfProxy() {
    // 중략 (target 객체와 invocation 정의, 위 main 메서드 내 코드와 동일)

    Object proxyObject = Proxy.newProxyInstance(TargetClass.class.getClassLoader(), new Class[]{TargetInterface.class},
            invocationHandler);

    assertAll(
            () -> assertDoesNotThrow(() -> (TargetInterface) proxyObject),
            () -> assertDoesNotThrow(() -> (TargetClass) proxyObject)
    );
}
테스트 결과, 인터페이스를 구현하는 TargetClass 타입으로의 형변환은 예외가 발생하는 것을 확인했다.
정리해보면, Jdk Dynamic Proxy 방식은 인터페이스의 타입을 명시해서 프록시를 만들고, 그렇기 때문에 인터페이스 타입으로만 형변환이 가능하다는 특징을 가지게 된다.
CGLIB
그럼 CGLIB 방식으로 프록시를 만든다는 말은 무엇일까?
CGLIB 은 java 라이브러리의 이름이다. 즉, 해당 라이브러리를 활용해서 프록시를 만드는 걸 CGLIB 방식으로 프록시를 생성하는 거라 말하는 거였다.
CGLIB 은 바이트코드 생성 라이브러리로, AOP 뿐 아니라 테스트, 데이터 접근 프레임워크 등 바이트코드를 변환하는 작업에 쓰이는 라이브러리다.
Byte Code Generation Library is high level API to generate and transform JAVA byte code. It is used by AOP, testing, data access frameworks to generate dynamic proxy objects and intercept field access.
- 출처: cglib 깃허브
여담으로 이 라이브러리는 2019년 이후로 유지되고 있지 않다. 따로 바이트코드 작업을 할 일이 있으면 다른 라이브러리를 고려해보는 것이 나을 것이다.
예제
다음과 같이 의존성을 추가해주고 cglib 프록시 예제를 만들어봤다.
// build.gradle
dependencies {
  implementation 'cglib:cglib:3.3.0'

  // ...
}
TargetClass: 프록시 대상 객체의 타입
package springproxy.cglib;

public class TargetClass {
    public String sayHello(String name) {
        System.out.println("sayHello() is called!");
        return "Hello" + name;
    }

}
CglibProxyExample: cglib으로 프록시를 생성하는 로직
CGlib 의 proxy.Enhancer 클래스와 proxy.MethodInterceptor를 활용해서 다음과 같이 프록시를 만들 수 있다.
package springproxy.cglib;

import net.sf.cglib.proxy.Enhancer;
import net.sf.cglib.proxy.MethodInterceptor;

public class CglibProxyExample {

    public static void main(String[] args) {
        Enhancer enhancer = new Enhancer();
        enhancer.setSuperclass(TargetClass.class); // 프록시 대상 클래스 설정

        MethodInterceptor methodInterceptor = (obj, method, args1, proxy) -> {
            System.out.println("Before method execution: " + method.getName());
            Object result = proxy.invokeSuper(obj, args1); // 실제 메서드 호출
            System.out.println("After method execution: " + method.getName());
            return result;
        };
        enhancer.setCallback(methodInterceptor);

        TargetClass proxy = (TargetClass) enhancer.create();
        proxy.sayHello("World");
    }

}
위 코드 로직을 정리하면 다음과 같다.
- Enhancer 인스턴스를 만든다.
- Enhancer 객체에 프록시 대상 클래스 (TargetClass) 를 설정한다.
- MethodInterceptor 를 정의한다.
- 여기서 원하는 메서드 실행 전 후 프록시 동작을 정의해줄 수 있다.
- Enhancer 객체에 정의한 MethodInterceptor 를 콜백으로 설정한다.
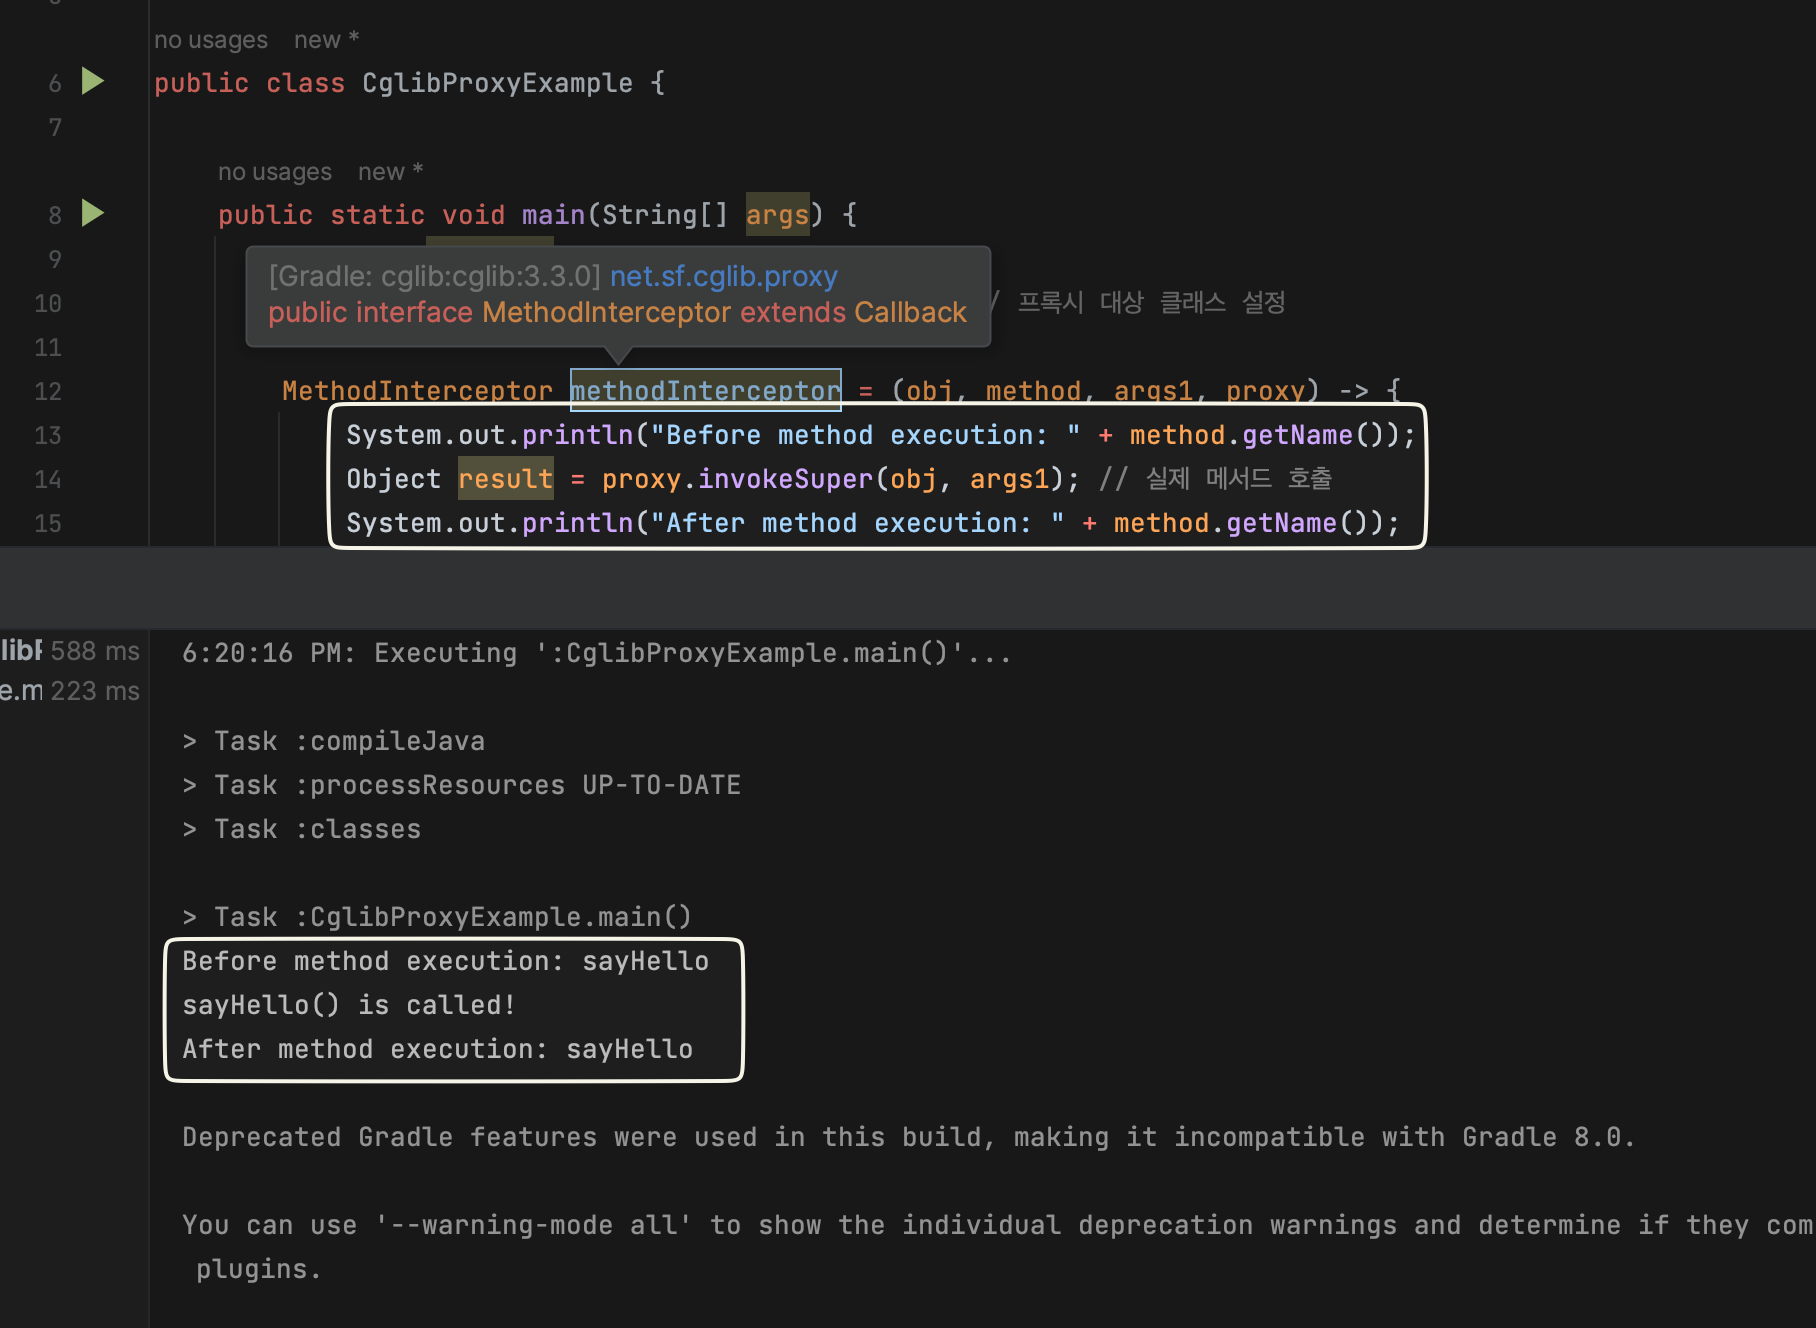
- 웬 callback 인가 했는데, MethodInterceptor 인터페이스가
cglib.proxy.Callback인터페이스를 상속하고 있었다.
- 웬 callback 인가 했는데, MethodInterceptor 인터페이스가
- 설정을 마친 Enhancer 객체의
create()를 호출해서 프록시 객체를 생성한다.
main 메서드를 실행해보면 다음과 같이 프록시가 잘 작동하는 것을 확인할 수 있었다!

Spring boot 의 기본 프록시 정책: CGLIB
- Spring boot AOP를 사용한다면, 아무 설정을 하지 않는 한 기본적으로 CGLIB 방식으로 프록시가 생성된다.
Spring AOP 에서도 Enhancer 클래스를 활용해서 프록시 객체를 만든다. CGLIB가 ASM라이브러리를 활용해서 바이트코드를 조작하는 거고, Spring 자체는 직접 바이트코드를 수정하는 역할은 하지 않는다.
스프링은 다음과 같은 흐름으로 CGLIB 를 활용한다.
- ProxyFactory에서 CglibAopProxy 클래스를 만든다.
- CglibAopProxy.getProxy() 내부에서 Enhancer 객체를 생성하고 DynamicAdvisedInterceptor를 등록해서 프록시 객체를 만든다.
- 프록시 호출 시 AOP의 DynamicAdvisedInterceptor가 호출된다.
jdk dynamic proxy 사용 시 주의할 점 - 예제
다음과 같이, 서비스 객체에서 policy 구현체를 주입받는 코드를 작성했다. 이 때 유의해야할 것은 MemberService 코드에서 필드를 MemberAgePolicy라는 '클래스' 타입을 선언했다는 것이다.
@Component
class MemberAgePolicy implements MemberPolicy {

  @Transactional
  public void validate(Member member) {
    // ...
  }

}

@Service
@RequiredArgsConstructor
class MemberService {

  private final MemberAgePolicy MemberAgePolicy;

}
그리고 Spring AOP 로 MemberAgePolicy의 validate 메서드 를 감싸는 aop를 정의해줬다.
package rosie;

import org.aspectj.lang.JoinPoint;
import org.aspectj.lang.annotation.Aspect;
import org.aspectj.lang.annotation.Before;
import org.aspectj.lang.annotation.Pointcut;
import org.springframework.stereotype.Component;

@Aspect
@Component
public class MemberAgePolicyAspect {

    @Pointcut("execution(* rosie.MemberAgePolicy.validate(..))")
    public void validateMethod() {}

    @Before("validateMethod()")
    public void beforeValidation(JoinPoint joinPoint) {
        System.out.println("Before validating: " + joinPoint.getSignature().getName());
    }

}
jdk dynamic proxy 방식으로 설정해주기
spring 기본 값으로는 java 인터페이스를 구현한 aop 컴포넌트가 jdk dynamic proxy 로 만들어진다.
하지만! Spring boot에서는 proxyTargetClass 를 true 로 설정하기 때문에 cglib으로 생성된다.
그렇기 때문에 jdk dynamic proxy 를 설정해주기 위해서 proxyTargetClass 값을 false로 설정해주고 예제를 실행해야 원하는 결과를 얻을 수 있다.
jdk dynamic proxy 를 사용한다면 프록시 객체가 구현 클래스의 타입이 아닌 인터페이스 타입으로 생성되기 때문에 DI가 실패하는 것을 확인할 수 있을 것이다.
그러나 proxyTargetClass 설정을 해주지 않으면 cglib으로 프록시가 만들어져서 di가 잘 이뤄지는 것을 확인할 수 있었다.
@SpringBootTest(classes = SpringPlaygroundApplication.class)
public class DiByClass {

    @Autowired
    private MemberAgePolicy memberAgePolicy;

    @Test
    void constructorInjection() {
        assertThat(AopUtils.isCglibProxy(memberAgePolicy)).isFalse(); // jdk dynamic proxy 를 예상했지만 테스트 실패,
    }
Expecting value to be false but was true
org.opentest4j.AssertionFailedError:
Expecting value to be false but was true
cglib을 비활성화하고 다시 시도
isCglibProxy(memberAgePolicy)가 true 로 나왔고, cglib 프록시임을 확인해볼 수 있었다.
만약 인터페이스 구현체의 프록시 생성 방법으로 Jdk Dynamic Proxy 를 사용하고자 한다면
spring.aop.proxy-target-class 를 false 로 지정해주면 된다.
spring.aop.proxy-target-class=false
이렇게 기본 프록시 생성 전략으로 cglib을 사용하지 않도록 설정하고, 예제 코드를 다시 실행해보면..
@Component
class MemberAgePolicy implements MemberPolicy { // 인터페이스를 구현

  @Transactional
  public void validate(Member member) {
    // ...
  }

}

@Service
@RequiredArgsConstructor
class MemberService {

  private final MemberAgePolicy MemberAgePolicy;

}
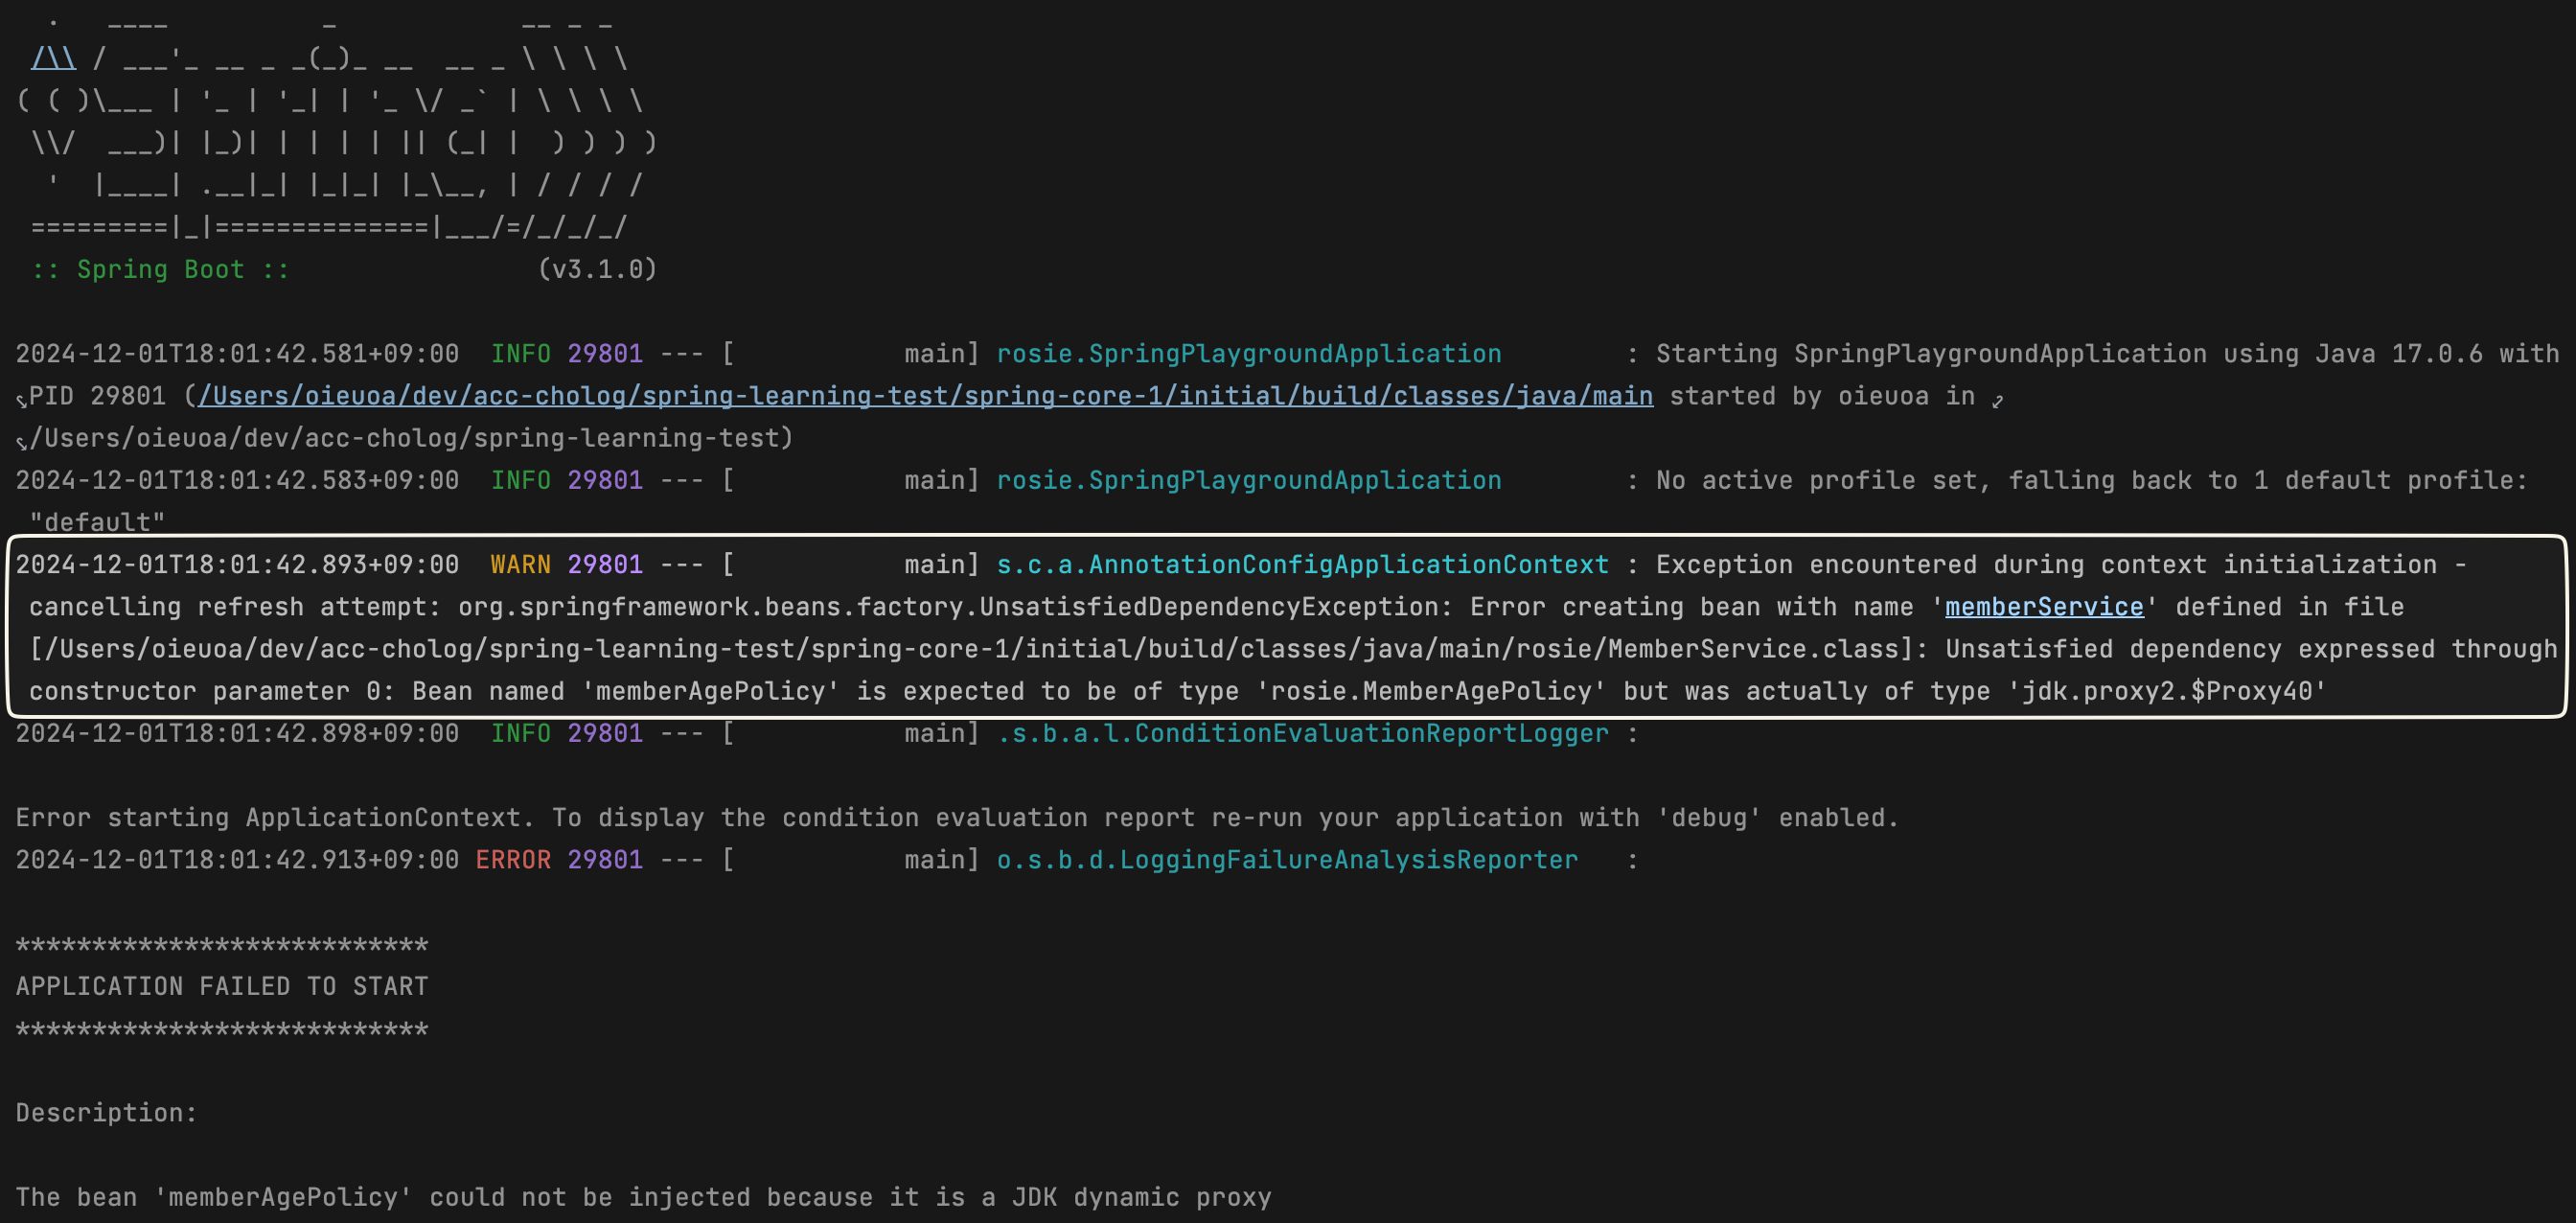
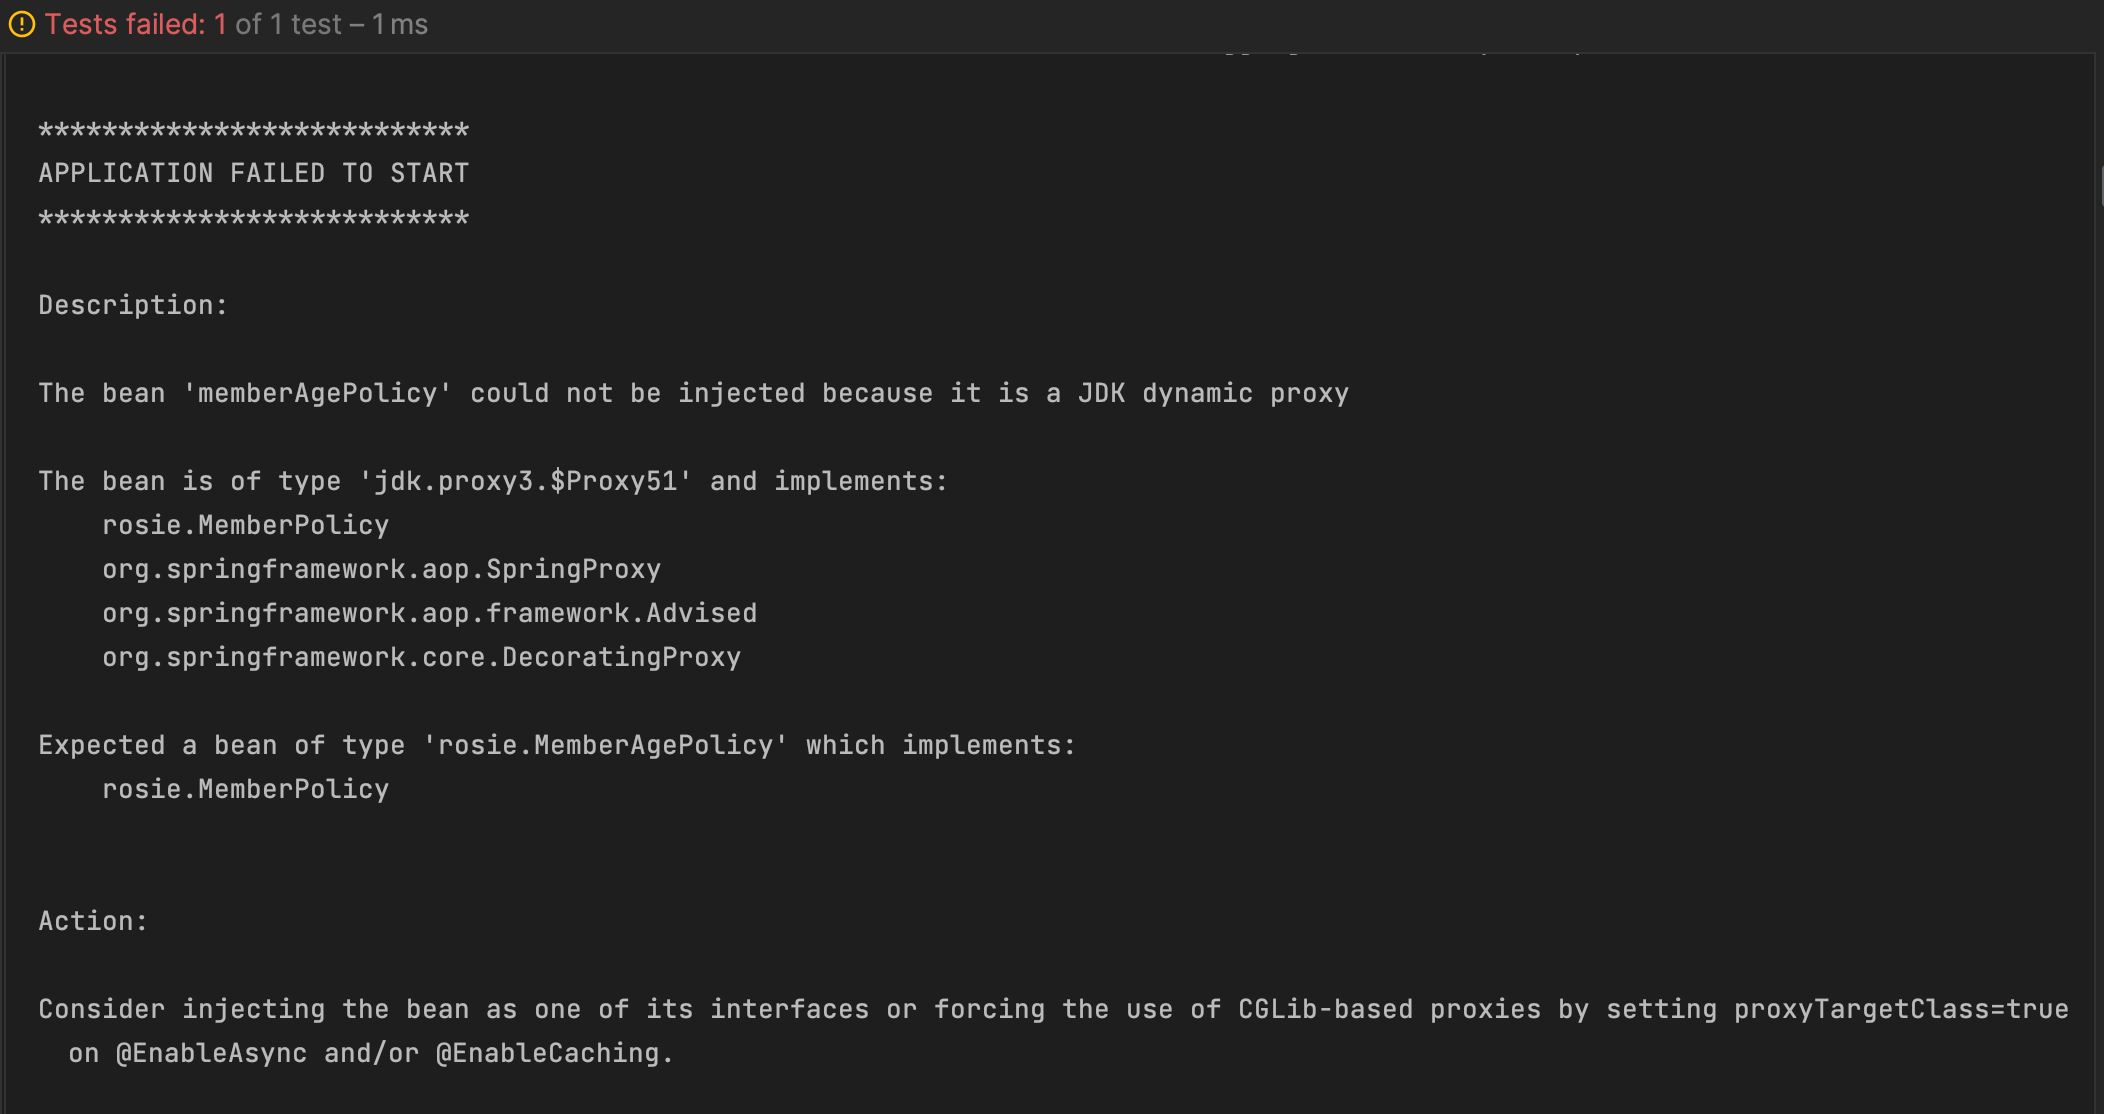
그러면 컨텍스트를 생성할 때 다음 예외를 만날 수 있게 된다.
애플리케이션 실행 시

컨텍스트 생성 테스트 실행 시

jdk dynamic proxy 를 사용하게 되면 인터페이스 타입으로만 di 가 가능하다는 것을 직접 확인해볼 수 있었다.
